


Key Takeaways
-
Cast and extruded acrylic—and clear and dark acrylic—require different decisions.
-
Standard blue diode lasers suit many dark, opaque acrylics; for cutting clear acrylic, evaluate a CO₂ workflow first.
-
A six-step test ladder quickly identifies settings for your acrylic type, color, and thickness.
-
Diagnose melted, frosted, rough, or incomplete edges through heat, focus, warping, air assist, and material batch.
Melted edges rarely come from “too much power” alone. Wavelength absorption, acrylic type, color, focus, speed, air assist, and repeated heat all matter. At iKier, we recommend identifying cast versus extruded and clear versus dark acrylic before adjusting speed and power.

Image: The iKier K1 Ultra 36W supports workflows that balance acrylic-cutting efficiency with everyday engraving.
Identify Cast and Extruded Acrylic First
Cast acrylic generally produces a more even frosted-white engraving, although brand and thickness tolerance still affect cutting. Extruded sheet may engrave more transparently or build melted edges, while its price and dimensional consistency can suit some applications. “PMMA” alone is not enough: record cast/extruded, color, thickness, masking, and batch.
A blue diode near 455nm needs the material to absorb its light. Clear acrylic transmits much of that light and cannot be treated like black acrylic. When clear sheet must be cut through, choose a CO₂ wavelength suited to acrylic absorption.
Build Acrylic Settings with a Six-Step Test Ladder
Bind every setting to model, acrylic type, color, thickness, masking, air assist, focus, and optic condition. The offers 33–36W output, a 410×410mm work area, and a 0.08×0.1mm spot; the enclosed uses 55W. After choosing the model:
-
Record cast/extruded, color, brand, batch, and measured thickness.
-
Confirm that the masking and sheet composition are laser-safe; never test unknown plastic.
-
On same-batch scrap, hold power and focus constant and change only speed.
-
Once you find a through-cut range, compare passes, air assist, and cooling intervals.
-
Inspect front, back, kerf taper, melted edge, and time per part.
-
Repeat at least 3 times; for production, test a densely nested full sheet.
Save the most stable combination as the current material version for the same brand, color, and batch.

Image: The iKier K2 Pro 55W provides an integrated option for higher-load acrylic and wood processing.
Three Practical Methods for Clear Acrylic
1. Removable coating or paint for surface engraving
Apply a blue-light-absorbing medium whose SDS permits laser use. The laser acts on the coating to create a surface effect; this supports marking or shallow graphics, not cutting through clear sheet. Test cleaning first for cracking or haze.
2. Masking layer
Verified paper masking can aid positioning, reduce smoke staining, or change local absorption. Avoid PVC adhesive film and unknown plastic tape. Evaluate the masking itself for burning and residue.
3. Reverse engraving
Mirror the design and engrave from the back to keep the front smooth. The effect still depends on coating or absorption; reverse engraving must not be described as direct clear-acrylic cutting.
Why Edges Melt, Turn White, or Accumulate Slag
| Symptom | Common cause | First adjustment |
|---|---|---|
| Rounded top edge or buildup | Excess heat, low speed, insufficient cooling between passes | Increase speed, optimize passes, extend cooling interval |
| Bottom not through, top very wide | Incorrect focus, warped sheet, poor exhaust | Refocus, flatten, check air assist and bed |
| White/rough edge | Acrylic type, excessive airflow, or thermal cracking | Separate cast/extruded; run an airflow A/B test |
| Masking melts into edge | Unsuitable film or excessive heat | Confirm film; compare retained versus removed |
| Sudden local failure | Color/batch variation or dirty optic | Use same-batch scrap; inspect window optic |
A “flame-polished edge” does not come from blindly slowing the cut. First achieve stable penetration and low taper, then improve the edge through scraping, progressive sanding, or suitable professional finishing. Open flame, solvent vapor, and heat polishing each require a separate safety assessment.

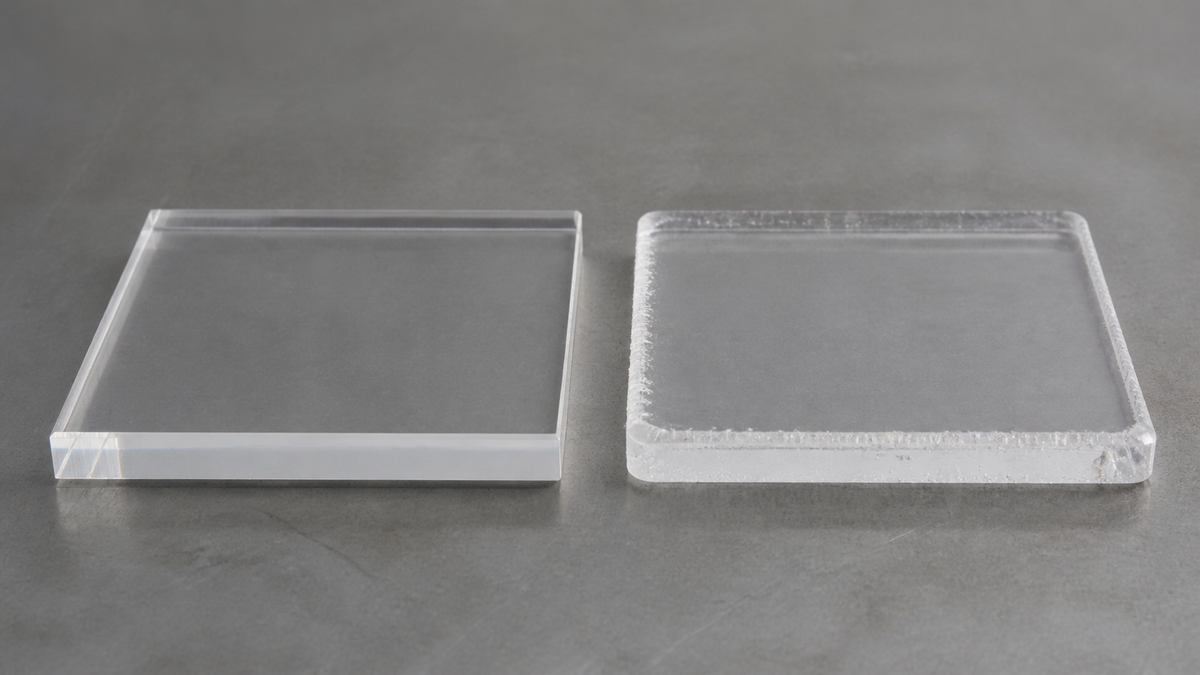
Scene illustration: Comparing a smooth straight edge with white, bubbled melt helps reveal excess heat accumulation.
Safety Boundaries
Process only identified acrylic approved for laser use. Never place PVC, vinyl, or unknown plastic in a laser. Use an enclosure and effective exhaust, supervise continuously, and keep suitable fire equipment nearby. The K2 Pro uses an enclosed Class 1 design with automatic fire suppression plus lid-open and tilt detection, integrating several safety functions; exhaust, material verification, and human supervision remain pre-start checks.
For mainly 3–5mm dark acrylic, compare measured K1 Ultra 36W time with the cost of an open workspace. For higher cutting capacity, enclosure, autofocus, and an integrated exhaust path, review the K2 Pro 55W. Validate a settings matrix before scaling.
Run One More Heat Test Before Batch Production
One successful part does not prove dense nesting is safe. Cut a full row at normal spacing and record melted edges, smoke, bed temperature, and masking changes from first to last. Small cutouts can move in airflow or fall into the honeycomb; adjust cut order and retain bridges, then separate manually. Stop immediately if sustained flame appears.
Conclusion
For clean acrylic edges, identify type and color first, then test speed, power, passes, air assist, and focus on same-batch scrap. For a compact open workflow, explore the ; for 55W cutting capacity and an enclosed configuration, see the .
FAQ
Q1: Can a blue diode cut clear acrylic directly? A: It is generally not a reliable cutting method. Coatings, masking, or reverse engraving can create some surface effects but do not equal cutting through clear sheet.
Q2: Why do acrylic edges melt? A: Common causes include excess heat, low speed, insufficient cooling between passes, poor focus, warping, and mismatched acrylic type.
Q3: Should cast and extruded acrylic use the same settings?


